Sunday, February 03, 2019

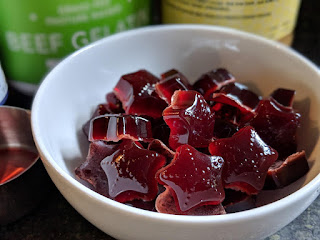
Elderberry Sour Gummies

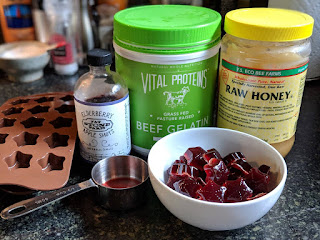
I want to share my Elderberry Sour Gummie Snack recipe! I've been playing around with these for a while and finally found the killer combo and an elderberry syrup that I like =)


Ingredients:
- 1/3 cup Fat Stone Farm Elderberry Apple Shots
- 1/3 cup lemon or lime juice or a mix of both (fresh squeezed and strained)
- 3 tbsp Raw Organic Honey
- 3 tbsp Grass Fed gelatin powder (I like Vital Proteins)
- Silicone molds for gummies (I use these )

Instructions:
1. Put gelatin powder in a small bowl and gently stir in the lemon/lime juice and elderberry syrup and let sit to bloom for 5 minutes.
2. While blooming, measure out honey. (I find it easier to warm mine up so it will just pour)
3. Set molds on cookie sheet for easy transport.
4. Gently stir bloomed gelatin and honey in small saucepan over low heat till all blended together and gelatin melts. (do not boil!)
5. Using a large medicine dropper or turkey baster (that's what I use) fill in molds to desired height. (I find this recipe fills 3 of my star molds with the stars 2/3rds full.)
6. Place filled molds in freezer for 5-10 minutes to let set.
7. Remove from freezer and pop out gummies into air tight container. I use a mason jar.
8. Store in fridge up to 2 weeks, if they last that long!
Saturday, February 02, 2019

Artisan No-Knead Multigrain Bread

I've been wanting to bake bread more for a while now, but always found it too intimidating or felt frustrated at how long it took. Then I found a recipe for using a dutch oven to bake bread "quickly" and easily. (This recipe) So I bought a dutch oven, I made it and it actually turned out really yummy!

The bread was good, but I wanted to experiment with something that had more whole grains and texture. So then I found this recipe and liked how it sounded, but had to tweak a few things. I'd found this awesome seed/grain blend at Trader Joe's and really wanted to bake it in.


I also didn't have any Rye flour, and I had this Artisan Bread Flour I'd bought, plus some Organic Whole Wheat Flour. Lastly, I wanted to use my dutch oven to bake it in, even though the recipe said to use a pizza stone and pan of water. So anyway, here's my version!

 
  *This recipe doesn’t take much hands-on time, but it requires thinking ahead. The day you mix the dough, you’ll need 1 hour for soaking add-ins and 2 hours for a rise. The day you bake the bread, you need a 40 minute rest and a 35 minute baking time (plus the ever-painful cool down period!). The recipe also uses several special components, including a dutch oven. Make sure to read through the entire recipe before trying!

Description: This no-knead multigrain bread recipe requires very little hands-on time and makes two hearty loaves of bread. Enjoy right away or freeze for later!


INGREDIENTS:
- 1/4 cup rolled oats
- 1/4 cup Trader Joe's Super Seed & Ancient Grains Blend
- 1/4 cup raw sunflower seeds
- 1/4 cup water
- 3 cups lukewarm water
- 1 tablespoon active yeast (approx 1.25 packets)
- 1 1/2 table spoons kosher salt (25g)
- 4 cups (576g) Artisan Bread Flour (I used Bob's Red Mill
- 2 cups (304g) Whole Wheat Flour (again, I used Bob's)

INSTRUCTIONS:

  1. Soak the add-ins. In a small bowl, combine oats, Seed & Grain blend, sunflower seeds and water. Let sit for at least 30 min to 1 hr.
  2. In a large mixing bowl, combine 3 cups of lukewarm water with 1 tbsp of active yeast.
  3. With a large spoon, mix in 1 1/2 tbsp kosher salt, 4 cups of bread flour, 2 cups of whole wheat flour and soaked oats/seeds/grains blend. Mix only enough to combine; do not knead or overwork the dough. If necessary, use your hands to make sure all ingredients are incorporated.
  4. Cover with a towel and allow the dough to rise at room temperature. You want it to at least double in size. This should take about 2 hours. If your house is cooler like mine, try and find or create a warm spot. I propped mine on a cooling rack above my slow-cooker while making some whole chicken veggie soup, that the bread was going to be eaten with later on =)


    ***At this point you can either bake or save the dough***
  5.  To save: Cover the bowl with plastic wrap and place it in the refrigerator. It can be used anytime in the next 2 weeks. 
  6. To bake: Heat oven to 450 degrees F. Once oven is preheated, place a 6-quart Dutch oven (with cover) in oven 30 minutes before baking. I baked mine one at a time in the dutch oven.
  7. On a floured surface divide the dough into two balls. It will be sticky, so have plenty of flour on hand to dust your surface and hands. As your scooping it out of the bowl with your hands or a spoon, much of the air in it will deflate, but try not to work it too much. Adding a bit of flour as necessary to work with the dough, shape each ball into a loaf by stretching the edges of the dough down and under the loaf, or pull them out and up to the center and then flip, then place on a sheet of parchment paper and set aside to rise again, approx 30 minutes.

  8. After the rest, sprinkle each loaf with flour and use a serrated knife to cut several 1/2″ deep slashes along the top of the loaves.
  9. Remove Dutch oven from oven. Carefully transfer one loaf to Dutch oven, with parchment paper beneath. Cover Dutch oven and return to oven.
  10. Bake bread 25-30 minutes covered, then another 10 to 15 minutes uncovered until dough is baked through and golden brown on top. Cool slightly before slicing. (you can use an instant read thermometer to check that the middle is done. It should read 205-210°F at the center.
  11. After cooling, the loaves can be frozen in an airtight bag, but who are we kidding! They're so good still warm with butter on top!